
WordPress Glossary
WordPress tutorials is the best place for WordPress beginners to start and familiarize themselves with the WordPress lingo. Admin Area Action AJAX Array Atom Author Administrator Attachment Apache Autosave Administration Screens Absolute Path Admin Bar bbPress Backlink Cookies Category Comments Content Management System (CMS) Custom Headers chmod Custom Fields Contributor Custom Backgrounds CSS cPanel Child Theme DDoS Database Default Theme DNS Dedicated Hosting Domain Name Editor Excerpt Filters Feed Fluid layout functions.php FTP Free Software Featured Image Filter Footer GitHub GPL Hooks .htaccess Home Page IP Address iFrame jQuery JavaScript Loop localhost Navigation Menus Memory Usage Multisite (MU) MySQL Media Media Settings Nonce Open Source PHP Page Post Meta Post Formats Pingback Post Status Parent Theme Post Types Plugin Editor Permalinks Profile Press This Primary Menu Plugin Post Slug Query QuickPress Robots.txt Responsive Theme Revisions RSS Subdomain Slug SSL Slider Security Keys Sidebar Subscriber Spam Splog Shared Hosting Screen Options SEO Static Front Page Settings Shortcodes Toolbar Tag Template Theme Taxonomy Theme Framework Thumbnail Sizes Theme Editor Theme Options Text Editor Trash Tools Template Tag Terms Updates User Role VPS Hosting Visual Editor WP_Query WordPress.com Widgets WordCamp wp-config.php WAMP
What is: Theme
In WordPress, a theme is a collection of templates and stylesheets used to define the appearance and display of a WordPress powered website. They can be changed, managed, and added from the WordPress admin area under Appearance » Themes. There are several free and paid WordPress Themes available. WordPress.org has a large collection of free ones in their Themes Directory. Each one comes with a different design, layout, and features. A user needs to choose the one that suits their taste and requirements for their website. There are those that are designed to serve specific kind of websites, e.g. WordPress Photography Themes are designed for photographers and photography websites. They can be modified by adding plugins or by adding code to the functions.php file. Changes can also be made in the form of a child theme. Themes generally consists of three parts in addition to images and JavaScript files. The three parts are the style.css file, the WordPress template files, and an optional functions.php file that will allow changes to be made to the theme. Every theme must have a unique style.css file. This doesn’t mean that the styles can’t be the same but rather that the identifying information in the header needs to be different otherwise you will have problems during installation. If it is not a child theme, then it also needs to have at least an index.php template file to control the display of content.Additional Reading
Parent Theme Theme Framework Responsive Theme Theme Editor Child Theme Theme Options Default Theme
Wordpress Function Reference
Wordpress Function Reference Theme Functions ♦ WordPress Theme Functions ♦ Wordpress Function Reference ♦ wordpressTutorial
header.php is a default template used in most WordPress themes. It defines the header area of web pages generated by WordPress. The header file will typically be loaded on every page of your WordPress site, allowing changes to be made to a single file, that will apply across the entire website.
Most WordPress themes have some default templates with code to generate HTML output for particular sections of a website.
index.php. To display the main page of a website.header.php. Displays the header section.sidebar.php. Generates HTML output for the sidebar section.footer.php. Displays the footer section.functions.php. Contains code and functions to be used in a theme.single.php. Displays the single post page.comments.php. Displays comments and comment form.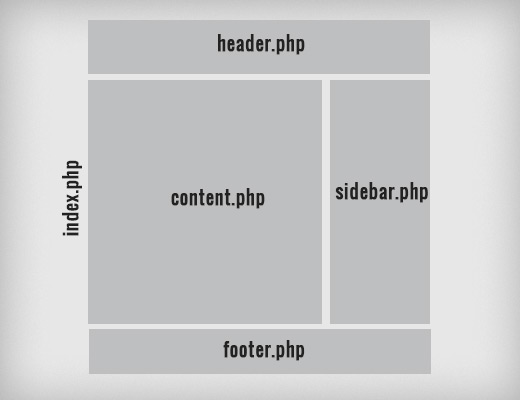
single.php can have header, footer, sidebar, and content template included into it. WordPress allows users to add as many as they would like. Some themes will have them for custom loops and sidebars as well.
WordPress also has a templates hierarchy. If a theme doesn’t have single.php for some reason, then WordPress will automatically fall back to a more general templates like index.php.
Apart from these templates, each WordPress theme must have a style definition file named style.css.
<?php the_author(); ?>The author template tag displays the name of the post author in WordPress. Usage example:
<p>This post is written by <?php the_author(); ?></p>Template tags can also return a data set and users can choose what to display using parameters. Example:
<a href="<?php bloginfo('url'); ?>" title="<?php bloginfo('name'); ?>"><?php bloginfo('name'); ?></a>
Template tags are basically PHP functions, so any PHP function defined by a WordPress plugin or theme can be used as a template tag. To use a theme function as a template tag, the function should be defined in the theme’s functions.php file.
Template tags are PHP functions, so they can also be used inside other PHP functions and template tags. In the example below, we have defined a function that displays some text.
Example:
function donation_request() {
    $this_article = wp_title('',true);
    echo '<p>Hi, if you enjoyed reading '.$this_article.' please consider <a href="http://www.example.com/donate/">donating</a>.';
}
To use this function in a template, add this line of code:
<?php donation_request(); ?>Multiple template tags can also be combined to accomplish a goal.

<?php
/*
 * Template Name: Featured Article
 * Template Post Type: post, page, product
 */

 get_header();  ?>
This code defines a new template called Featured Article and makes it available for post, page, and product post types.
wpb-single-post.php on your desktop. 
get_header() line.
/*
* Define a constant path to our single template folder
*/
define(SINGLE_PATH, TEMPLATEPATH . '/single');

/**
* Filter the single_template with our custom function
*/
add_filter('single_template', 'my_single_template');

/**
* Single template function which will choose our template
*/
function my_single_template($single) {
global $wp_query, $post;

/**
* Checks for single template by category
* Check by category slug and ID
*/
foreach((array)get_the_category() as $cat) :

if(file_exists(SINGLE_PATH . '/single-cat-' . $cat->slug . '.php'))
return SINGLE_PATH . '/single-cat-' . $cat->slug . '.php';

elseif(file_exists(SINGLE_PATH . '/single-cat-' . $cat->term_id . '.php'))
return SINGLE_PATH . '/single-cat-' . $cat->term_id . '.php';

endforeach;
}
This code first checks to see if WordPress is requesting a single post. If it is, then it tells WordPress to look for the template in /single/ folder of your WordPress theme.
Now you need to add template files defined by this code.
Connect to your WordPress site using an FTP client or File Manager in cPanel and go to /wp-content/themes/your-theme-folder/.
Inside your current theme folder, you need to create a new folder called ‘single’.
Now you need to open this folder and create a new file inside it. Go ahead and name this file single-cat-{category-slug}. Replace {category-slug} with your actual category slug.
For example, if you have a category called ‘News’, then you will create single-cat-news.php file. If you have a category called ‘Travel Tips’, then create a template single-cat-travel-tips.php, and so on.
 Now these template files will be totally empty. As a starting point, you can copy the contents of your single.php file from your theme folder and paste them inside each of these templates.
You can now edit these templates to make your desired changes.
Once you are done, you can go to your website and view a post. It will use the template that you have created for the category where this post is filed.
Now let’s suppose you have a post filed in two categories News and Travel Tips. WordPress will automatically show the template for ‘News’ because it appears first in alphabetical order.
On the other hand, if you filed a post in a category and didn’t create a template for that category, then WordPress will fallback to the default single.php template of your theme.
Now these template files will be totally empty. As a starting point, you can copy the contents of your single.php file from your theme folder and paste them inside each of these templates.
You can now edit these templates to make your desired changes.
Once you are done, you can go to your website and view a post. It will use the template that you have created for the category where this post is filed.
Now let’s suppose you have a post filed in two categories News and Travel Tips. WordPress will automatically show the template for ‘News’ because it appears first in alphabetical order.
On the other hand, if you filed a post in a category and didn’t create a template for that category, then WordPress will fallback to the default single.php template of your theme.
/**
* Define a constant path to our single template folder
*/
define(SINGLE_PATH, TEMPLATEPATH . '/single');

/**
* Filter the single_template with our custom function
*/
add_filter('single_template', 'my_single_author_template');

/**
* Single template function which will choose our template
*/
function my_single_author_template($single) {
global $wp_query, $post;

/**
* Checks for single template by author
* Check by user nicename and ID
*/
$curauth = get_userdata($wp_query->post->post_author);

if(file_exists(SINGLE_PATH . '/single-author-' . $curauth->user_nicename . '.php'))
return SINGLE_PATH . '/single-author-' . $curauth->user_nicename . '.php';

elseif(file_exists(SINGLE_PATH . '/single-author-' . $curauth->ID . '.php'))
return SINGLE_PATH . '/single-author-' . $curauth->ID . '.php';

}
Next you need to connect to your website using FTP or File Manager in cPanel and then go to /wp-content/themes/your-theme-folder/.
If you haven’t already created a folder called /single/ inside it, then let’s go ahead and create it now.
Inside this folder, you need to create a template using the author’s username in the template name. For example, single-author-johnsmith.php.
This template will be empty, so you can copy paste the contents of your theme’s single.php template and use it as a starting point.
You can now visit your website to view a post created by the specific author. It will now use the template you created.
That’s all for now.
Do you want to learn about WordPress file and directory structure? The core WordPress software, themes, plugins, and user uploads are all stored on your website. In this beginner’s guide, we will explain the WordPress file and directory structure.
Most users can run their WordPress site without ever learning about WordPress files or directories. However, understanding how WordPress stores files and directories can help you solve many common WordPress problems on your own.
This guide will help you:
This information also helps you learn which WordPress files should you backup.
You will also be able to perform troubleshooting tasks like deactivating all WordPress plugins, switching to a default theme, or fix other common WordPress errors.
Having said that, let’s take a look at WordPress file and directory structure.
First, you will need a FTP client to connect to your WordPress server. See our guide on how to use FTP to upload WordPress files for detailed instructions.
An easier alternative to FTP is File Manager. It is a web based application that comes built into cPanel dashboard of your WordPress hosting account.
Once you have connected to your WordPress site either using FTP or File Manager, you will see a file and directory structure that looks like this:

Files and folders in the red squares are the core WordPress files. These are the files and folders that run your WordPress site. You are not supposed to edit those files on your own.
Here is a list of core WordPress files and folders you would see in your WordPress site’s root directory.
Your WordPress root directory contains some special configuration files. These files contain important settings specific to your WordPress site.

You may need to edit wp-config.php or .htaccess file sometimes. Be extra careful when editing these two files. A slight mistake can make your site inaccessible. When editing these two files, always create backup copies on your computer before making any changes.
If you don’t see .htaccess file in your root directory, then checkout our guide on why you can’t find .htaccess file in your WordPress root directory.
Depending on how your WordPress site is setup, you may or may not have the following files in your root directory.
WordPress stores all uploads, plugins, and themes in wp-content folder.

It is generally assumed that you can edit files and folders inside wp-content folder. However, this is not entirely true.
Let’s take a look inside wp-content folder to understand how it works and what you can do here.

The contents of wp-content folder may differ from one WordPress site to another. But all WordPress sites usually have these:
WordPress stores your theme files in /wp-content/themes/ folder. You can edit a theme file, but it is generally not recommended. As soon as you update your theme to a newer version, your changes will be overwritten during the update.
This is why it is recommended to create a child theme for WordPress theme customization.
All WordPress plugins you download and install on your site are stored in /wp-content/plugins/ folder. You are not supposed to edit plugin files directly, unless you wrote the plugin just for your own WordPress site.
In many WordPress tutorials, you will see code snippets that you can add to your WordPress site. The best way to add custom code to your WordPress site is by adding it to functions.php file of your child theme or by creating a site-specific plugin.
WordPress stores all your image and media uploads in the /wp-content/uploads/ folder. By default, uploads are organized in /year/month/ folders. Whenever you are creating a WordPress backup, you should include uploads folder.
You can download fresh copies of WordPress core, your theme, and installed plugins from their sources. But if you lose your uploads folder, then it would be very hard to restore it without a backup.
Some other default folders you may see in your wp-content directory.
Many WordPress plugins may also create their own folders inside your wp-content folder. For example, in the screenshot above we have a gallery folder created by Envira Gallery plugin.
Some of these folders may contain important files. Like the gallery folder may contain your gallery images. You should always backup such folders to avoid losing important data.
Other folders may contain files that you can safely delete. For example your caching plugins like W3 Total Cache or WP Super Cache may store cached files in their own folders.
That’s all, we hope this article helped you understand WordPress file and directory structure. You may also want to see our beginner’s guide to WordPress database management with phpMyAdmin.
A WordPress Theme has many benefits, too.
Why should you build your own WordPress Theme? That's the real question.
WordPress Themes should be coded using the following standards:
WordPress Themes live in subdirectories of the WordPress themes directory (wp-content/themes/ by default) which cannot be directly moved using the wp-config.php file. The Theme's subdirectory holds all of the Theme's stylesheet files, template files, and optional functions file (functions.php), JavaScript files, and images. For example, a Theme named "test" would reside in the directory wp-content/themes/test/. Avoid using numbers for the theme name, as this prevents it from being displayed in the available themes list.
WordPress includes a default theme in each new installation. Examine the files in the default theme carefully to get a better idea of how to build your own Theme files.
For a visual guide, see this infographic on WordPress Theme Anatomy.
WordPress Themes typically consist of three main types of files, in addition to images and JavaScript files.
Let's look at these individually.
The simplest Theme possible is a child theme which includes only a style.css file, plus any images. This is possible because it is a child of another theme which acts as its parent.
For a detailed guide to child themes, see Child Themes.
In addition to CSS style information for your theme, style.css provides details about the Theme in the form of comments. The stylesheet must provide details about the Theme in the form of comments. No two Themes are allowed to have the same details listed in their comment headers, as this will lead to problems in the Theme selection dialog. If you make your own Theme by copying an existing one, make sure you change this information first.
Note the list of Tags used to describe the theme. These allow user to find your theme using the tag filter. You can find a full list in the Theme Review Handbook.
The comment header lines in style.css are required for WordPress to be able to identify the Theme and display it in the Administration Panel under Design > Themes as an available Theme option along with any other installed Themes.
A theme can optionally use a functions file, which resides in the theme subdirectory and is named functions.php. This file basically acts like a plugin, and if it is present in the theme you are using, it is automatically loaded during WordPress initialization (both for admin pages and external pages). Suggested uses for this file:
The default WordPress theme contains a functions.php file that defines many of these features, so you might want to use it as a model. Since functions.php basically functions as a plugin, the Function_Reference list is the best place to go for more information on what you can do with this file.
Note for deciding when to add functions to functions.php or to a specific plugin: You may find that you need the same function to be available to more than one parent theme. If that is the case, the function should be created in a plugin instead of a functions.php for the specific theme. This can include template tags and other specific functions. Functions contained in plugins will be seen by all themes.
Here is the list of the Theme files recognized by WordPress. Of course, your Theme can contain any other stylesheets, images, or files. Just keep in mind that the following have special meaning to WordPress -- see Template Hierarchy for more information.
These files have a special meaning with regard to WordPress because they are used as a replacement for index.php, when available, according to the Template Hierarchy, and when the corresponding Conditional Tag returns true. For example, if only a single post is being displayed, the is_single() function returns 'true', and, if there is a single.php file in the active Theme, that template is used to generate the page.
At the very minimum, a WordPress Theme consists of two files:
Both of these files go into the Theme directory. The index.php template file is very flexible. It can be used to include all references to the header, sidebar, footer, content, categories, archives, search, error, and any other page created in WordPress.
Or, it can be divided into modular template files, each one taking on part of the workload. If you do not provide other template files, WordPress may have default files or functions to perform their jobs. For example, if you do not provide a searchform.php template file, WordPress has a default function to display the search form.
Typical template files include:
Using these template files you can put template tags within the index.php master file to include these other files where you want them to appear in the final generated page.
Here is an example of the include usage:
<?php get_sidebar(); ?>

<?php get_footer(); ?>
The default files for some template functions may be deprecated or not present, and you should provide these files in your theme. As of version 3.0, the deprecated default files are located in wp-includes/theme-compat. For example, you should provide header.php for the function get_header() to work safely, and comments.php for the function comments_template().
For more on how these various Templates work and how to generate different information within them, read the Templates documentation.
The files defining each page template are found in your Themes directory. To create a new custom page template for a page you must create a file. Let's call our first page template for our page snarfer.php. At the top of the snarfer.php file, put the following:
<?php
/*
Template Name: Snarfer
*/
?>
The above code defines this snarfer.php file as the "Snarfer" template. Naturally, "Snarfer" may be replaced with most any text to change the name of the page template. This template name will appear in the Theme Editor as the link to edit this file.
The file may be named almost anything with a .php extension (see reserved Theme filenames for filenames you should not use; these are special file names WordPress reserves for specific purposes).
What follows the above five lines of code is up to you. The rest of the code you write will control how pages that use the Snarfer page template will display. See Template Tags for a description of the various WordPress template functions you can use for this purpose. You may find it more convenient to copy some other template (perhaps page.php or index.php) to snarfer.php and then add the above five lines of code to the beginning of the file. That way, you will only have to alter the HTML and PHP code, instead of creating it all from scratch. Examples are shown below. Once you have created a page template and placed it in your theme's directory, it will be available as a choice when you create or edit a page. (Note: when creating or editing a page, the Page Template option does not appear unless there is at least one template defined in the above manner.)
WordPress can load different Templates for different query types. There are two ways to do this: as part of the built-in Template Hierarchy, and through the use of Conditional Tags within The Loop of a template file.
To use the Template Hierarchy, you basically need to provide special-purpose Template files, which will automatically be used to override index.php. For instance, if your Theme provides a template called category.php and a category is being queried, category.php will be loaded instead of index.php. If category.php is not present, index.php is used as usual.
You can get even more specific in the Template Hierarchy by providing a file called, for instance, category-6.php -- this file will be used rather than category.php when generating the page for the category whose ID number is 6. (You can find category ID numbers in Manage > Categories if you are logged in as the site administrator in WordPress version 2.3 and below. In WordPress 2.5 the ID column was removed from the Admin panels. You can locate the category id by clicking 'Edit Category' and looking on the URL address bar for the cat_ID value. It will look '...categories.php?action=edit&cat_ID=3' where '3' is the category id). For a more detailed look at how this process works, see Category Templates.
If your Theme needs to have even more control over which Template files are used than what is provided in the Template Hierarchy, you can use Conditional Tags. The Conditional Tag basically checks to see if some particular condition is true, within the WordPress Loop, and then you can load a particular template, or put some particular text on the screen, based on that condition.
For example, to generate a distinctive stylesheet in a post only found within a specific category, the code might look like this:
<?php
if ( is_category( '9' ) ) {
    get_template_part( 'single2' ); // looking for posts in category with ID of '9'
} else {
    get_template_part( 'single1' ); // put this on every other category post
}
?>
Or, using a query, it might look like this:
<?php
$post = $wp_query->post;
if ( in_category( '9' ) ) {
    get_template_part( 'single2' );
} else {
    get_template_part( 'single1' );
}
?>
In either case, this example code will cause different templates to be used depending on the category of the particular post being displayed. Query conditions are not limited to categories, however, see the Conditional Tags article to look at all the options.
It is possible to use the WordPress plugin system to define additional templates that are shown based on your own custom criteria. This advanced feature can be accomplished using the "template_include" action hook. More information about creating plugins can be found in the Plugin API reference.
To load another template (other than header, sidebar, footer, which have predefined included commands like get_header()) into a template, you can use get_template_part(). This makes it easy for a Theme to reuse sections of code.
When referencing other files within the same Theme, avoid hard-coded URIs and file paths. Instead reference the URIs and file paths with bloginfo(): see Referencing Files From a Template.
Note that URIs that are used in the stylesheet are relative to the stylesheet, not the page that references the stylesheet. For example, if you include an images/ directory in your Theme, you need only specify this relative directory in the CSS, like so:
h1 {
    background-image: url(images/my-background.jpg);
}
When developing Themes, it's good to keep in mind that your Theme should be set up so that it can work well with any WordPress plugins users might decide to install. Plugins add functionality to WordPress via "Action Hooks" (see Plugin API for more information).
Most Action Hooks are within the core PHP code of WordPress, so your Theme does not have to have any special tags for them to work. But a few Action Hooks do need to be present in your Theme, in order for Plugins to display information directly in your header, footer, sidebar, or in the page body. Here is a list of the special Action Hook Template Tags you need to include:
For a real world usage example, you'll find these plugin hooks included in the default Theme's templates.
As of WordPress 3.4, a new Theme Customization feature is available by default for nearly all WordPress themes. The Theme Customization admin page is automatically populated with options that a theme declares support for with add_theme_support() or using the Settings API, and allows admins to see non-permanent previews of changes they make in real time.
Theme and plugin developers interested in adding new options to a theme's Theme Customization page should see the documentation on the Theme Customization API. Additional tutorials on the Theme Customization API are available at the Ottopress.com website.
You should escape dynamically generated content in your Theme, especially content that is output to HTML attributes. As noted in WordPress Coding Standards, text that goes into attributes should be run through esc_attr() so that single or double quotes do not end the attribute value and invalidate the XHTML and cause a security issue. Common places to check are title, alt, and value attributes.
There are few special template tags for common cases where safe output is needed. One such case involves outputting a post title to a title attribute using the_title_attribute() instead of the_title() to avoid a security vulnerability. Here's an example of correct escaping for the title attribute of a post title link when using translatable text:
<a href="<?php the_permalink(); ?>" title="<?php sprintf( __( 'Permanent Link to %s', 'theme-name' ), the_title_attribute( 'echo=0' ) ); ?>"><?php the_title(); ?></a>
Replace deprecated escape calls with the correct calls: wp_specialchars() and htmlspecialchars() with esc_html(), clean_url() with esc_url(), and attribute_escape() with esc_attr(). See Data_Validation for more.
To ensure smooth transition for language localization, use the WordPress gettext-based i18n functions for wrapping all translatable text within the template files. This makes it easier for the translation files to hook in and translate the labels, titles and other template text into the site's current language. See more at WordPress Localization and I18n for WordPress Developers.
Implement the following template tags to add WordPress-generated class attributes to body, post, and comment elements. For post classes, apply only to elements within The Loop.
When developing a Theme, check your template files against the following template file standards.
Here's an example of a correctly-formatted HTML5 compliant head area:
<!DOCTYPE html>
<html <?php language_attributes(); ?>>
    <head>
        <meta charset="<?php bloginfo( 'charset' ); ?>" />
        <title><?php wp_title(); ?></title>
        <link rel="profile" href="http://gmpg.org/xfn/11" />
        <link rel="pingback" href="<?php bloginfo( 'pingback_url' ); ?>" />
        <?php if ( is_singular() && get_option( 'thread_comments' ) ) wp_enqueue_script( 'comment-reply' ); ?>
        <?php wp_head(); ?>
    </head>
<?php wp_footer(); ?>
</body>
</html>
<h2><?php printf( __( 'Search Results for: %s' ), '<span>' . get_search_query() . '</span>'); ?></h2>
<script type="text/javascript">
/* <![CDATA[ */
// content of your Javascript goes here
/* ]]> */
</script>
Create a screenshot for your theme. The screenshot should be named screenshot.png, and should be placed in the top level directory. The screenshot should accurately show the theme design and saved in PNG format. While .jpg, .jpeg, and .gif are also valid extensions and file formats for the screenshot, they are not recommended.
The recommended image size is 1200px wide by 900px tall. The screenshot will usually be shown smaller but the over-sized image allows for high-resolution viewing on HiDPI displays. Note that because the Manage Themes screen is responsive, the top and bottom of the screenshot image might not be viewable so keep graphics near the center.
Themes can optionally support the Theme Customize Screen. For an example code, see A Sample WordPress Theme Options Page.
When enabling the availability of the Theme Customize Screen for a user role, use the "edit_theme_options" user capability instead of the "switch_themes" capability unless the user role actually should also be able to switch the themes. See more at Roles and Capabilities and Adding Administration Menus.
If you are using the "edit_themes" capability anywhere in your Theme to gain the Administrator role access to the Theme Customize Screen (or maybe some custom screens), be aware that since Version 3.0, this capability has not been assigned to the Administrator role by default in the case of WordPress Multisite installation. See the explanation. In such a case, use the "edit_theme_options" capability instead if you want the Administrator to see the "Theme Options" menu. See the additional capabilities of Administrator role when using WordPress Multisite.